On 1 Jan 2018, at 16:43, . . . . wrote:Happy New Year All,Are there any tutorials for creating a VW PIO? Specifically, I am looking to create a PIO that allows me to insert custom length church pews based on the length I enter. Or if something like this exists, I’d be all ears.Thanks much!
. . . .
Hi . . . . ,
Small note: In contrast with symbols that help reduce document size: the PIO is drawn in place and will actually increase the document size as if you drew the objects yourself.
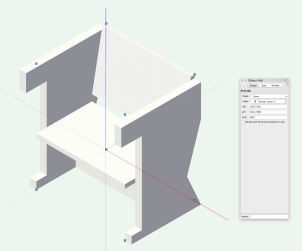
You start with drawing your Church Pew in an other wise empty file (really empty).
Make sure to extrude while you are in the Right view. This makes creating the PIO so much simpler
Give the extrusion of the seat (the length of the Pew) and easy to recognise number. (Sorry for my evil sense of humor, but I don’t believe in the magic forces of numerals, like 13 or 7)
Maybe you want to make the arm rests into symbols with the name ‘Arm_Rest’ This saves a bit on document size.
Drawn Pew:
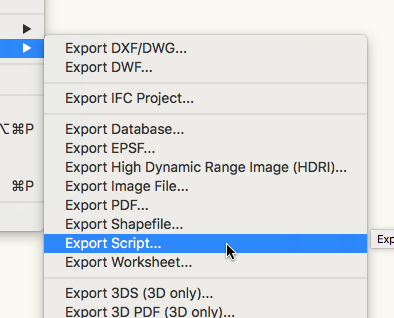
Export the whole file as a script:
Open the script in a simple Text editor. I’m a big fan of BBedit and Text Wrangler as they don’t add anything to the document.

Now open the Plug-in manager and create a Linear Object: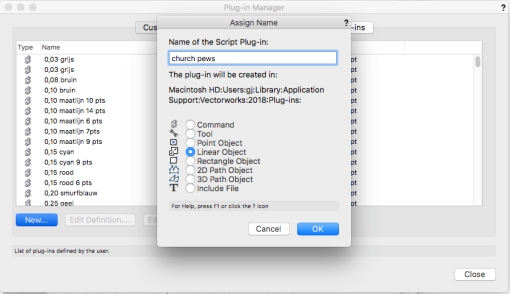
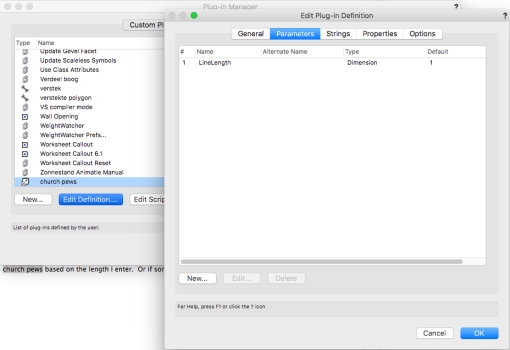
Check the Definition to add more variables if you need them.
The variable LineLength is standard for a Linear Object.
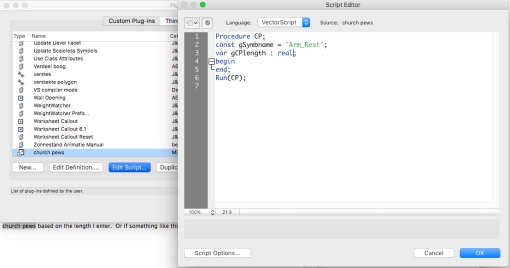
Now Edit the script and type the following:
Procedure CP;
const gSymbname = ‘Arm_Rest’;
var gCPlength : real;
begin
gCPlength :=
end;
Run(CP);
const gSymbname = ‘Arm_Rest’;
var gCPlength : real;
begin
gCPlength :=
end;
Run(CP);
If you copy from this site you may want to paste in and copy from BBedit to flush unwanted characters. (BTW Your script may start on line one).
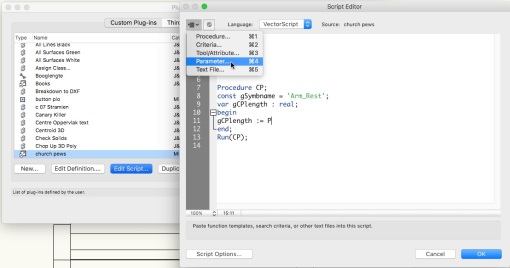
Now add a ‘P’ followed by the name of variable to to read that variable into your script.
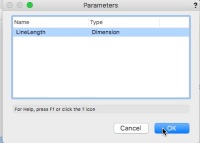
To prevent typos you can read the var name from the menu Parameter… and choose the variable in the next dialog:
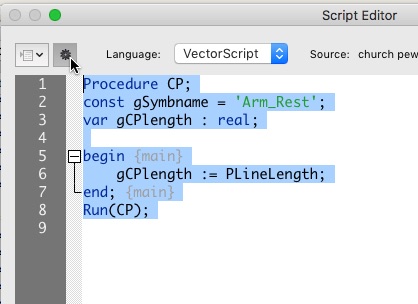
Now your script will read something like this:
Procedure CP;
const gSymbname = ‘Arm_Rest’;
var gCPlength : real;
begin {main}
gCPlength := PLineLength;
end; {main}
Run(CP);
It is good practice to keep many comments in your scripts between {} . You will always regret later not commenting the most simple decisions you take now.
Test run the script by clicking on the sprocket button
First check the existence of the symbol Arm_Rest:
if Getobject(‘Arm_Rest’) = NIL then Create_Arm_Rest;
Create_Arm_Rest
Will be a sub procedure in your code.
The function Getobject returns a handle. I don’t need the handle variable, I can immediately check if it is empty ie: NIL.
Procedure CP;
const gSymbname = ‘Arm_Rest’;
var gCPlength : real;
Procedure Create_Arm_Rest;
Begin {Create_Arm_Rest}
end; {Create_Arm_Rest}
begin {main}
if GetObject(‘Arm_Rest’) = NIL then
Create_Arm_Rest; {check for the existence of the symbol, if not create it}
gCPlength := PLineLength; {reads LineLength variable back into script.
end; {main}
Run(CP);
Now copy the {Symbol Library Entries} and paste them in the Procedure Create_Arm_Rest:
BeginSym(‘Arm_Rest’);
NameClass(‘None’);
BeginXtrd(0,50);
ClosePoly;
PenSize(2);
PenPat(2);
FillPat(1);
PenFore(0,0,0);
PenBack(65535,65535,65535);
FillFore(0,0,0);
FillBack(65535,65535,65535);
boolResult := SetDefaultBeginningMarker(0,15,0.125,0,34,0.05,FALSE);
boolResult := SetDefaultEndMarker(0,15,0.125,0,34,0.05,FALSE);
Poly(
-522.5,0,
-522.5,55.001292239404421,
-445,55.001292239404421,
-445,670,
-600,670,
-600,800,
0,800,
0.000000000000035,559.264705882353269,
-105,235.000000000000057,
0,0
);
objectHandle := LNewObj;
SetDropShadowData(objectHandle, 0,0.1,0.05,#315.0000000000d,75,0,0,0);
EnableDropShadow(objectHandle, FALSE);
objectHandle := LNewObj;
SetObjectVariableBoolean(objectHandle, 1160, FALSE);
boolResult := SetEntityMatrix(objectHandle, 0,0,0,0,-0,0);
EndXtrd;
ResetOrientation3D;
Rotate3D(#90.00000000000d,#-0.0000000000000d,#90.00000000000d);
Move3D(-25,300,0);
objectHandle := LNewObj;
SetDropShadowData(objectHandle, 0,0.1,0.05,#315.0000000000d,75,0,0,0);
EnableDropShadow(objectHandle, FALSE);
EndSym;
SetSymbolOptionsN(‘Arm_Rest’,0,1,”);
tempHandle := GetObject(‘Arm_Rest’);
SetObjectVariableBoolean(tempHandle, 130, FALSE);
objectHandle := LNewObj;
SetDropShadowData(objectHandle, 0,0.1,0.05,#315.0000000000d,75,0,0,0);
EnableDropShadow(objectHandle, FALSE);
If you test run the script you will see a few errors. That is because the copied creation code uses a few handles and a boolean.
Add them to the header of your sub procedure:
Procedure Create_Arm_Rest;
var objectHandle, tempHandle : Handle;
boolresult : Boolean;
Begin {Create_Arm_Rest}
BeginSym(‘Arm_Rest’);
NameClass(‘None’);
. . .
SetDropShadowData(objectHandle, 0,0.1,0.05,#315.0000000000d,75,0,0,0);
EnableDropShadow(objectHandle, FALSE);
end; {Create_Arm_Rest}
Now in BBedit in part of the Object creation code look for our value ‘666′ and replace it for our variable gCPlength

Paste the extrude text into the Create_Seat procedure.
In the {main} part of your code you need to call the procedure.
Create a procedure for placing the armrest symbols:
Procedure Place_Symbol(x_pos :real);
You give it a new variable, that variable needs to be used in the code:

Procedure Place_Symbol(x_pos : Real); {Places the symbol Arm_Rest}
var objectHandle : Handle;
Begin
Symbol(‘Arm_Rest’,0,0,#0.0000000000000d);
ResetOrientation3D;
Rotate3D(#-0.0000000000000d,#-0.0000000000000d,#-0.0000000000000d);
Move3D(x_pos,-300,0);
SetObjectVariableInt(LActLayer, 101, 1);
objectHandle := LNewObj;
SetDropShadowData(objectHandle, 0,0.1,0.05,#315.0000000000d,75,0,0,0);
EnableDropShadow(objectHandle, FALSE);
end; {Place_Symbol}
The place_Symbol procedure needs to be called from the main part of your code, twice.
begin {main}
if GetObject(‘Arm_Rest’) = NIL then
Create_Arm_Rest; {check for the existence of the symbol, if not create it}
gCPlength := PLineLength;
Create_Seat;
Place_Symbol(-25);
Place_Symbol(gCPlength + 25);
end; {main}
Check your code by test running it.
If there are no errors, then close the editor and the manager.
Go to the workspace editor.
Click on tools and drag the Church Pew from left to right in the desired tool set.
Here to download the VectorWorks 2018 PIO that I made while typing this VectorScript lesson.

